
Just a few days back, I was treated to a delicious apple-pie, baked by my better half. However, as the trend is nowadays, I had to first photograph it, and only after that could I take a bite out of it. So, here is how the photograph came about. This was captured for sharing on Instagram to promote our homestay (Maini’s Hill Cottages).
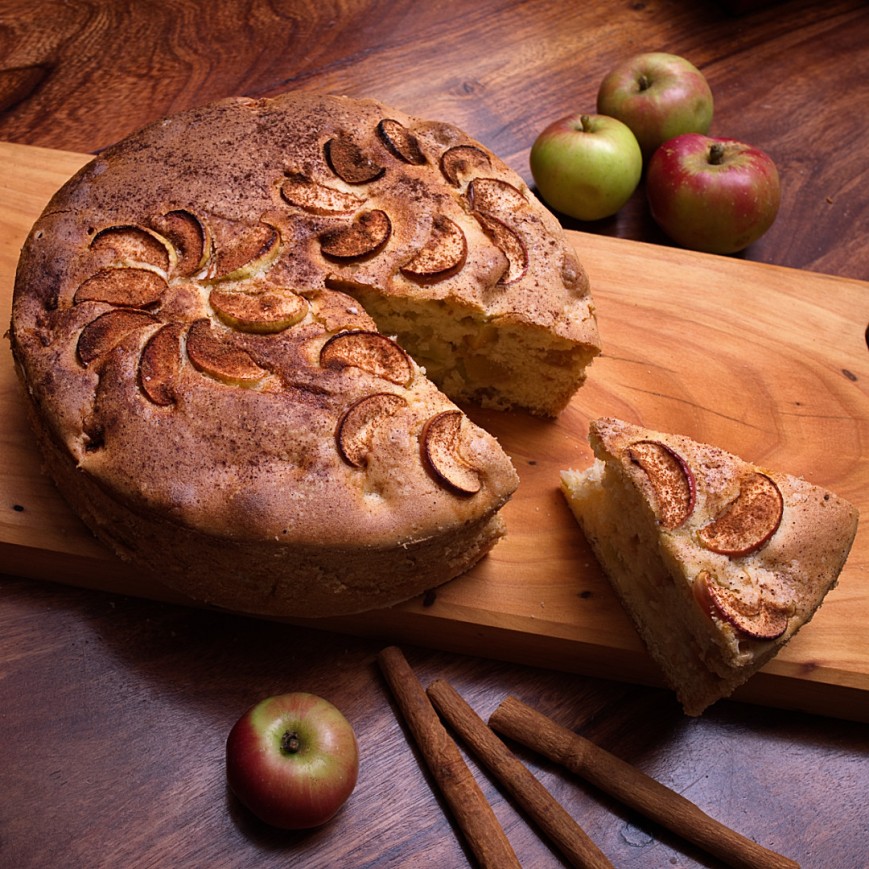
(The delicious apple pie. This was the image that we used for the Instagram post –Apple Pie on Instagram. The one on Instagram is of higher quality than the one here. The image here is a little compressed for use on this site. Do visit the link to see the better version of this photograph.)
The Apple Pie
With nothing to do at home and a small bounty of homegrown apples, this was an obvious outcome. I’ll not write the recipe here. However, it smelled heavenly. Fresh baked, out of the oven, it was a hard task for me to first photograph it and then eat it. Since it was to be eaten afterward, I did not use any of my usual food photography aids. Some examples of those aids which render the food useless for eating – Food Photography
The main ingredients were these aromatic natural variety of Cortland apples and Cinnamom, apart from whatever went into the base. I am not sure about the rum, though some of it definitely went into me, while the pie was being baked.
Set-Up
For the photography, I used the following equipment – Nikon Df full-frame body, Zeiss 25mm lens, 2 speedlights triggered wirelessly by a Nikon SU-200, 1 light blue colored gel filter.
Along with apple-pie, I needed some props. So, I used the leftover apples (which incidentally were not as beautiful as the ones that went into the pie), some cinnamon sticks, and a wooden chopping board. Everything was set up on an old wooden table.
Setting up the Composition
We did not want to place the pie directly on the table, so the chopping board came to rescue. It’s a thick board which was a challenge as well as a blessing. More about this aspect later on. For the photograph, I set up three apples on one side; A small triangular piece of the pie a little away from the ‘mother’ pie; And three cinnamon sticks on the lower part of the frame.
All the three components formed a triangle or an arrow, pointing towards the apple pie.
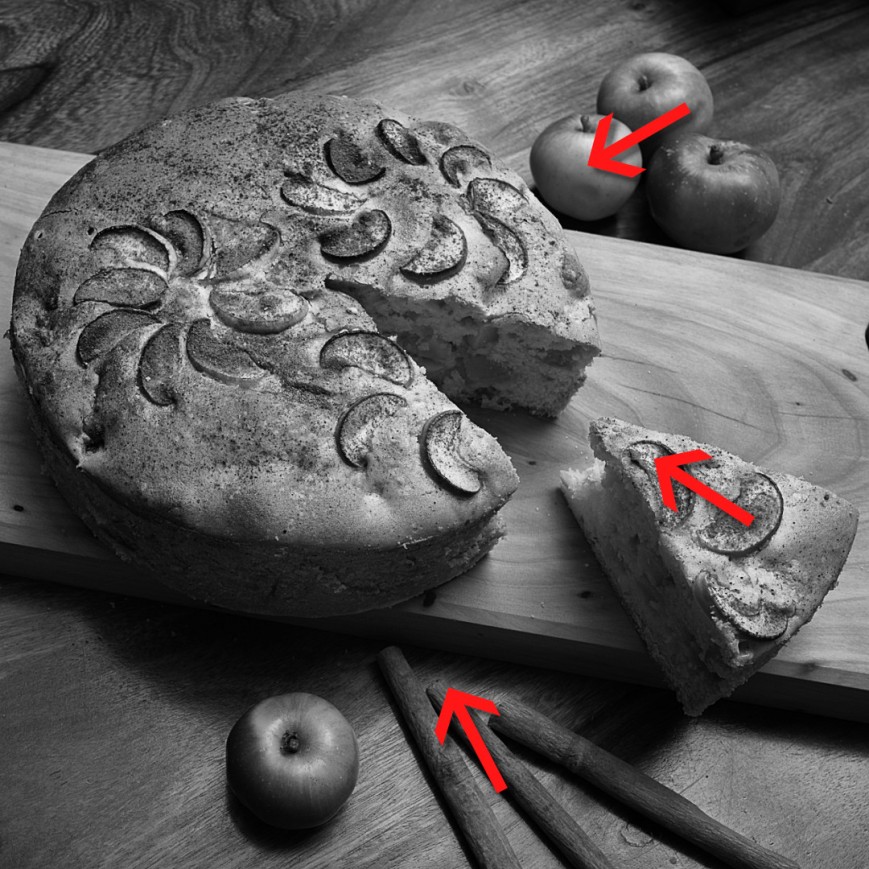
(The three supporting elements were placed in a manner that pointed to the main apple pie)
In composition terms, this is called empowering the subject. Composition Rules – Part I. All the supporting elements pointed to the pie!
Another thing that I prefer is using an odd number of main elements and an odd number of supporting elements. The 3 apples on top, 1 piece of the pie, 3 sticks of cinnamon. Odd numbers seem to work well with photographs.
The lone apple in the corner was placed by my assistant in photography, my daughter. She felt that the corner felt too lonely and vacant. Somehow, kids have an innate sense of balance in composition which tends to get wiped away by stereotyped schooling.
There were some crumbs scattered here and there which added a natural touch to the photograph, but with the small native resolution of Instagram, they seemed to distract rather than add a natural touch to the photograph. I had to ‘clone’ them out while post-processing.
The thick chopping board provided a nice shadow which acted as an ‘underline’ for the main subject.
Lighting Set-Up
This article was an afterthought, so I did not capture any photographs of the actual setup. I’ll try to explain the setup with the description here.
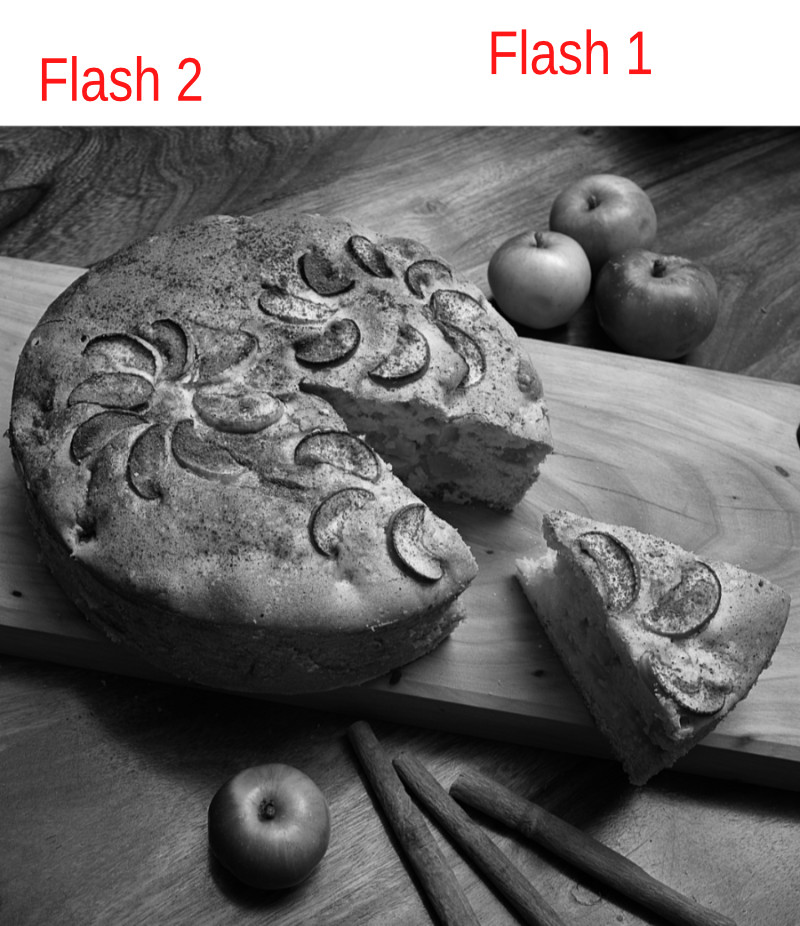
The Flash 2 was a Speedlight that pointed up towards the yellow wall and ceiling above. The light from there fell back to the composition after getting reflected and after taking up a warm hue from the reflecting surface. I will refer to this unit as the ambient speedlight. There was a bright tungsten bulb also in the room, that was behind and above my back. It also provided some amount of warm diffused light all over the subject.
Flash 1 was a speedlight set to fire under a silver umbrella. The silver umbrella provided a slightly harsh light compared to the ambient flashlight. I also placed a light blue gel filter on it. The reflected light from the umbrella fell directly in the center of the composition. The umbrella itself was placed quite low, near the table.
For flash exposure, I used the i-TTL mode. The speedlights were triggered by the SU-800 mounted on my camera. (Nikon CLS and SU-800). For the ambient speedlight, I did not use any flash compensation. For the speedlight under the umbrella, I set a -2 EV flash compensation on the SU-800 unit.
This setup was very different from the usual left-right dual unit setup that most photographers use for food and product photography. Ambient light setup (Flash 2 and the room bulb) was actually enough for the diffused lighting of the composition. It was Flash 1 that did the magic.
Firing the flash so as to cause a glare/reflection from the shiny table surface, adds a touch of glamour to the image. The cool color gives this ‘highlight’ a character. Someone once pointed out to me that this makes the composition look like as if being viewed in a glossy magazine or print, where the room light is getting reflected off the paper. Maybe that is what happens, maybe not. However, I am somehow partial towards such subtle highlights in compositions.
Exposure and Post-Processing
The camera was set to manual mode with ISO at 100. I had to use an aperture of f/11. This provided me enough depth of field to have the top of the pie as well the surface of the table in reasonable sharpness. A thinner chopping board would have reduced the overall height and I could have gotten away with f/8 too then. Here, f/11 was the widest I could open. Anything lower than 11 would have softened the image due to diffraction effects.
I used a shutter speed of 1/125 seconds. The reason was to cut down my dependence on the bulb light. This is a common trick that I use. Increase the shutter speed to reduce the ambient light exposure. This does not affect the speedlights that anyway have a very short firing duration (they last a fraction of the time when the shutter is open even for 1/125 second).
For post-processing, I used Affinity Photo, where I changed the curves a little and added some amount of sharpening.
(The final image!)
… and the photoshoot ended
Needless to say that the perfectly baked pie did make a good subject.
Once the photo-shoot ended, we were permitted to enjoy the pie. We finished it in a matter of minutes. There were many more in the oven. The ones getting baked were rectangular and in aluminum foil… to be gifted to some of our friends. What do you think? How many out of those 3 in the oven did we gift?
Further Reading:
The Stairs Photograph – Improving Composition
Food Photography
Learning to Instagram
Learning to Instagram (Part 2)

Wow Shivam Jee !! Your new fan and follower here. I must say I am mighty impressed 🙂
You gave us some very important lessons that even amateurs like me can implement. I never gave any thought to the triangle being made or that the three objects are pointing towards the main object. That’s awesome 😀 I learned something today. Thanks.
LikeLiked by 1 person
Thanks. There are many such things that can empower the main element in the composition. Do check out my other articles too – https://maini.live/list-of-writings/
LikeLike
Sure I will 🙏
LikeLike
You’re Superman to get such a beautiful photograph done first 😂
Martha Stewart needs to watch out for your wife 😉
LikeLiked by 1 person
Yes, it definitely was a challenge getting the photograph first and then having the apple-pie. I’ll show your comment to my wife too. Thanks.
LikeLiked by 1 person
Please do! 🙂
LikeLike
Seeing the pic of the delicious Apple Pie- equal marks to the cook , the composer (your daughter) and the photographer ,makes a hope come to my mind that all is not lost in these COVID19 pandemic times . On showing this pic to all my nursing and doctor staff working in covid icu unequivocally bought a smile to all the faces (some were asked politely to wipe the drool from their chins).Thanks Dr Shivam .Now can you please courier us the pie……
LikeLiked by 1 person