
Eye-sight of individuals varies a lot. Some use spectacles and others don’t. Even those who do not use spectacles, end up with reading glasses after around 40 years of age. Camera manufacturers understand this and therefore they provide ways to incorporate minor adjustments to the camera, in sync with the requirements of the varying eye-sight.
Refractive Error in Eyes
Let us first understand the need for glasses itself. The eye works in a very similar manner to a camera. An image is formed on a photo-sensitive layer called the retina. This converts the light to electrical impulses and helps the brain to see. The retina is to the eye what sensors are to digital cameras. The optical system of the eye (cornea and lens) helps in forming the image in the eye (on the retina). Refractive errors happen when the optical system of the eye can’t form a sharp image on the retina. To correct these errors, people wear glasses or contact lenses (and nowadays get laser surgery done on the cornea). By adding the required refractive correction to the eye, the image forms properly on the retina. Remove this aid and the person can’t see well enough!
Another interesting fact – The lens in the eyes is capable of changing its shape. This helps in focusing on nearby objects. What we photographers call as macro/micro capabilities, the ophthalmologists call the ability as ‘accommodation’. As the eye ages, this ability gets reduced. Near focusing becomes difficult (Presbyopia). So all the people with perfect vision also end up getting reading glasses after a certain age.
More about eyes and cameras – Our Eyes vs Camera
Camera and the need for Diopter correction
The lens in the camera forms a real image on the focusing screen. There is a complicated prism or a set of mirrors that forward this image through the eyepiece towards the eye. The power of the eyepiece also comes into play. The magnifying power of the eyepiece forms a virtual image (in front of the viewfinder) at around a meter in most of the cameras. This is what we see through the optical viewfinder of a DSLR.
Question 1. Why use an eyepiece magnifier?
Ans: Without the eyepiece, the real image formed on the focusing screen will be very close to the eyes, even with the convoluted path in the prism or mirror assembly. The eyes of the youngest of chaps with perfect vision will also not be able to focus so close without any kind of strain! So, an eyepiece is needed to provide some distance (thereby creating a virtual image). Usually, it is set to -1 Diopter. This also helps in enlarging the image and so it becomes easier to see the image.
Question 2. Why not see the focusing screen directly from a distance instead of using these prisms or mirrors?
Ans: A lot of cameras do exactly that. Yesteryear TLRs had ground-glass which was directly viewed and many of the large format cameras still use this method. DSLR’s, however, wanted to keep the size small while letting the photographer see through the lens (after all that is what the ‘single-lens reflex’ is all about), so this complicated setup is required.
Not everyone can see clearly the image of the focusing screen, formed by the optical assembly of the prism (or mirrors) and the eyepiece. This is due to the refractive errors in their eyes. Camera manufacturers came up with methods to take care of this problem. The most common being the built-in Dioptre adjustment in the camera. The adjustment can be done using the mini dial, slider or lever located near the eye-piece.
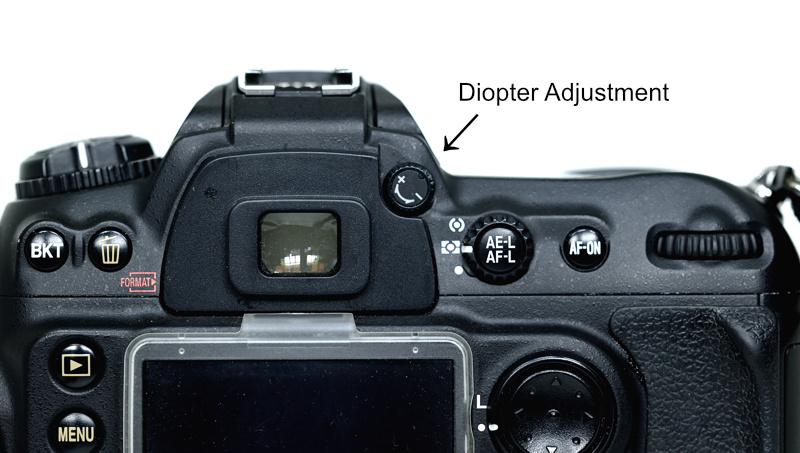
(Diopter Adjustment dial as seen after removing the rubber viewfinder eye-cup from Nikon D200)
For most photographers this setting is sufficient. In case the refractive error of the eye is beyond the adjustment provided, camera manufacturers (and some third-party vendors) also provide additional corrective lenses that can be used in place of the existing eyepiece or mounted on top of the existing eyepiece.
The correct way to adjust the Dioptre setting
The diopter adjustment is placed close to the viewfinder and for setting it correctly, one has to observe through the viewfinder. This is a sure-shot recipe for eye injury. So, be very careful. Don’t end up poking your own eye while adjusting the Diopters.
Follow the following steps:
- Mount the camera securely on a tripod.
- Focus on an object with good contrast. I like focusing on a bedside lamp for this purpose.
- Shift to manual focus so that pressing the shutter release does not alter the focus.
- Turn the dial or slider, all the way to the ‘plus’.
- Press the shutter release button halfway, to light up the various markings and writings in the viewfinder.
- Turn the dial (or slider/lever) step by step towards ‘minus’.
- Go one step beyond when the markings are tack sharp and then turn one step back.
- Now, look at the focused image. Turn the Diopter adjustment one more step up and down to ensure that the image is also the sharpest at the setting. Usually, the image and the markings will be sharp at the same setting. In some misaligned cameras, they may differ. When there is a difference, get the camera calibrated at the authorized service center.
- Mark the camera body and the diopter adjustment dial. I use a small dot made by white nail-polish (both on the dial and the camera body). This helps me quickly align the adjustment in the field if I accidentally knock it off.
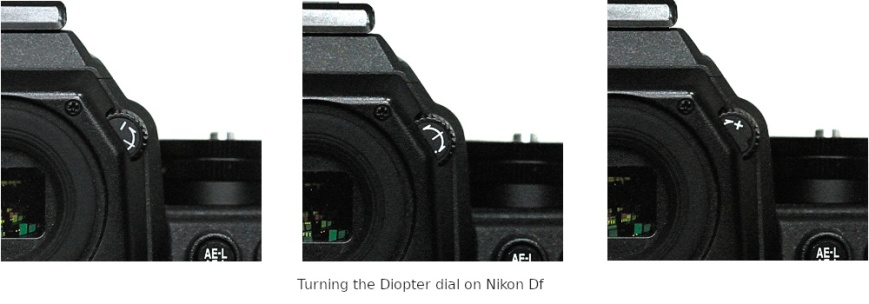
(Diopter dial on Nikon Df – turn it from “+” setting towards “-” and observe the markings in the viewfinder. Depending on your camera the +/- dial may indicate different range of corrections)
The falsehood related to Diopter adjustment
The most common wrong instruction which is floating around on various websites is to go all the way with the adjustment to where it starts to get blurred again and then turn back. The logic provided is that this will ensure that the setting it actually set at sharpest. Logic is fine but the people propagating this method forget the capabilities of the human eye. The flaw with this logic is that the eye continues to focus along with the change in diopter. So the viewfinder markings and image may appear clear over a range. Going all the way to minus (until the image starts to blur again) and back will lead to an additional minus correction. This will cause eye strain. The eye will try to negate this additional power by adjusting its own lens. Some individuals may also suffer an intermittent problem in looking at distant objects after prolonged use of cameras adjusted in this manner. In medical terms, this is called ‘transient spasm of accommodation’.
If you are above 40 years of age and in doubt, look at the viewfinder for a few seconds and then look at the distant scene. The transition should be immediate and the distant scene should come into focus immediately. If it takes time then your eye is not relaxed while looking at the viewfinder.
Spectacles and Diopter adjustment
To wear glasses or not wear glasses while using a camera? My recommendation – try both and see what seems more comfortable to you.
Photographers who leave their glasses on while using a camera say that it feels more natural. They have adjusted the camera diopters while wearing their glasses. These photographers can easily switch from looking into the viewfinder to looking around. No need to fiddle with the glasses.
Photographers who prefer to take their glasses off say that removing the glasses lets them see the whole frame easily. The glass tends to distance them from the viewfinder image and sometimes hides a part of the image. Removing the glasses also places their eyes closer to the rubber viewfinder cup and avoids stray light from distracting them. These photographers have obviously adjusted their cameras with their glasses off.
… and then there is the cute little girl whom I used to know many years back. She has shifted to contact lenses and uses the camera with them on. No more playing around with glasses (on and off) and she can see the complete viewfinder with ease.
