
There was a time when the film was not too sensitive to light and manufacturers were trying their best to boost up the sensitivity. These low sensitivity films required long exposure times and huge amount of light. No wonder that the old portraits had all serious looking people. Imagine being made to stand for many minutes in one pose and sometimes under bright uncomfortable lights! With the advancement of film sensitivity rose another requirement. There were times when the overall light entry had to be reduced without increasing the shutter speed or constricting the aperture too much. This is when the dark filters stepped in.
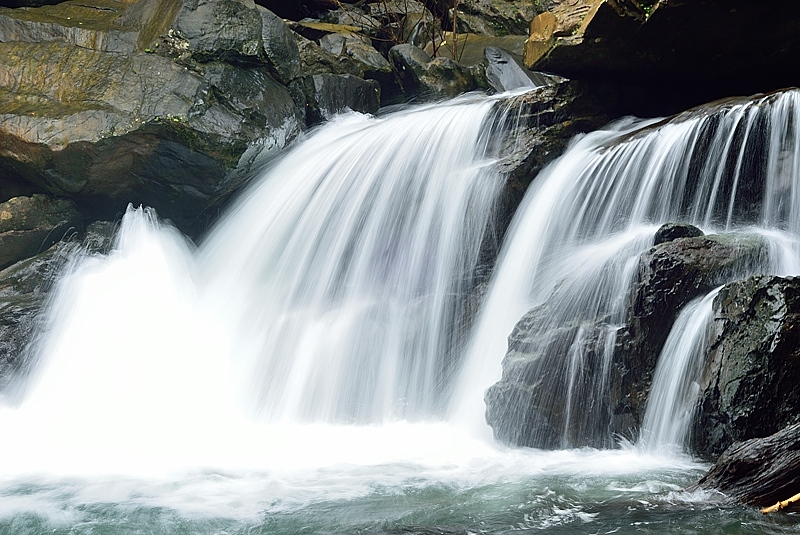
(Waterfalls – Nikon D200 with Nikkor 50mm, 1/4 sec with ND filter)
The true reduction in light is achieved by filters that do not impart any color of their own. These have an equal amount of every color which incidentally mixes down to a gray hue. These darkening filters are therefore neutral when it comes to change of colors. Neutral Density filters are aptly named. In short ‘ND’ filters.
ND filters
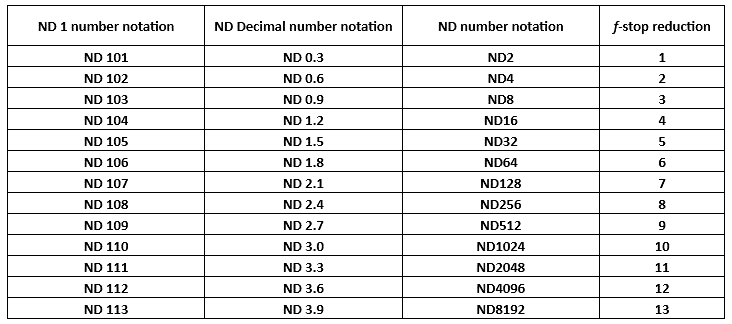
These come in various strengths and cut down the light to a differing degree. The higher the strength the more light is cut down. This thereby helps reduce shutter speeds to get those silky blurs of water-movement or the fog like effect of the sea-waves. In an evening seascape where the shutter speed requirement at f/8 at ISO 100 will be around 1/125 second, the waves will get frozen in time. For smooth blurring, one may require a shutter-speed of 2 seconds. This is 8 complete stops less than the conventional settings. Reducing the aperture to the smallest value, say f/22 can provide 3 complete stops of reduction but what about the remaining 5 stops? Secondly reducing the aperture to the smallest value degrades the picture quality by increased diffraction effects from the aperture blades. Best option is to screw on a ND filter with 2.4 strength which is roughly equal to 8 stops of light cut down. Now the same seascape can be comfortably clicked at 100 ISO with f/8 with 2 sec exposure, enough to blur the waves. See the table below for the amount of f-stop reduction provided by different filter strengths. All the notations are currently in use and vary from manufacturer to manufacturer.
I recommend screw-on ND filters since these do not let any light leak through from the sides, unlike the square filters held in their holders. Even the supposedly light-proof square filter holders available in the market, leak light. Since I am discussing this, there is one more important thing to procure if you are going to be using dark ND filters. This is an occluder for eyepiece of your camera. Some cameras come with it. If not, buy one. It can be a life-saver in long exposure photographs.
Buy good quality ND filters. The coatings ensure that there are no unsightly reflections. This is especially important since during the long exposure times, these minor reflections can create distracting and unsightly effects. Secondly, if you are planning on buying a dark filter (anything above 9 stops of light reduction) do check its performance data in IR band as well. In such long exposures, the infra-red and deep red light can sometimes produce weird effects. With such dark filters, be prepared to focus manually or focus and then use the filter. Calculate the exposure using – center weighted or spot metering, counting backwards in f-stops using filter factor or an external light meter and exposure calculator.
Use ND filters to-
- Create motion blur (waterfalls, sea-waves, clouds)
- Reducing depth of field in very bright light by using wide open apertures
- When using a flash on a camera with a focal-plane shutter, exposure time is limited to the flash sync speed. ND filter can help in situations when fill-flash is required but the aperture has to be open.
- Reduce the visibility of moving objects. I frequently use ND filter in street photography to freeze one stationary person while all the moving crowd gets blurred.
- Extended time exposures for any creative effects you want to create.
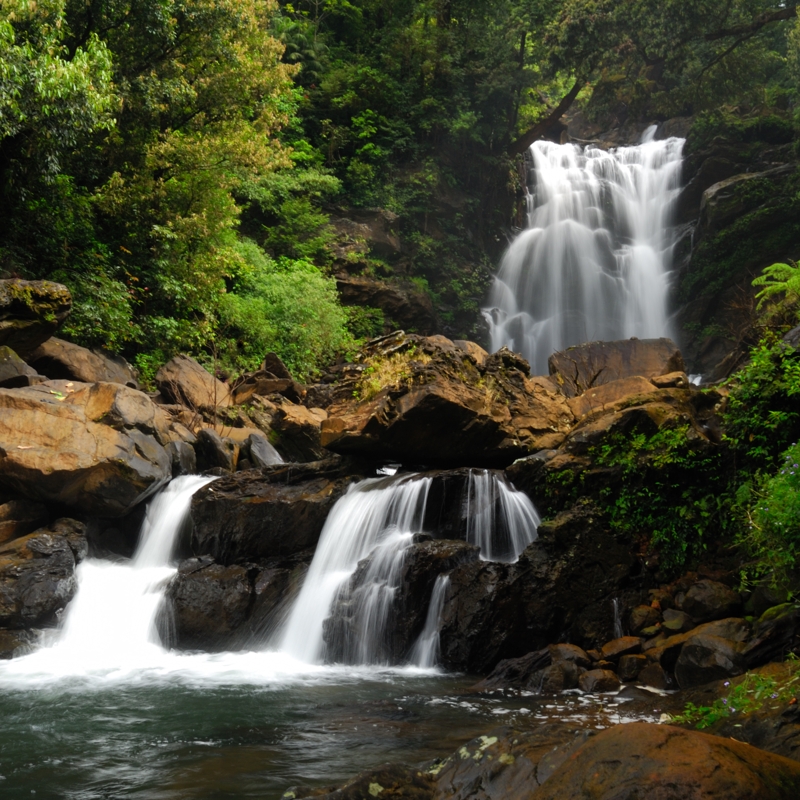
(Waterfalls. Shutter Speed 1/4 sec which was possible in the bright daylight by using a ND filter)
ND filters can be stacked if required though I do not recommend stacking more than a couple of these. While stacking a rule of thumb to be followed is to place the darker filter closer to the lens.
Variable ND filters
Long before variable filters became available, a lot of photographers including me, opted to use two linear polarizers. When one of these polarizers is rotated in relation to the other, the light cut down varies from 3 stops to 100% cut-off. The 3-stops is a standard polarizer’s filter factor. (Filter factors are used when calculating exposure using an external light meter and every filter comes with its filter-factor mentioned on the cover). Each polarizing filter cuts out light in one plane. As one of the polarizers is rotated, it cuts out an increasing amount of the remaining light. By using this technique, the amount of light reaching the sensor can be varied with almost infinite control. Unfortunately this two-polarizer system did not have any indication of the exact amount of light being cut down and photographers had to solely depend on the through-the-lens metering modes.
Filter manufacturers woke up very late to this requirement and came out with ‘Variable ND Filter’. This does the same thing as we were doing earlier but with some advantages. The number of optical surfaces is reduced since both the polarizing films are incorporated inside the two glass layers in a single filter itself. This minimizes the chances of flare. Secondly the Variable ND Filters also have markings on their frame which can be used with experience to indicate the approximate amount of light being cut at any particular position (Filter-factor for that position), though there are no clicks or exact ratings mentioned.
Some photographers complain of slight color shift with variable ND filters, the reason for which, I guess, must be inferior quality of the filter itself. Filters from reputed manufacturers like Hoya, Tiffen, Heliopan do not create significant color casts. The principle behind these is the polarizing action so sometimes the results can be quite unpredictable. Apart from cut in reflections there are chances of light and dark patches in the photograph depending on the orientation of the light. These patches appear and disappear like the letter ‘X’, on the diagonally opposite corners of the frame, and can be quite distracting especially at the middle range to the darker end of the effect. Use these faders (that’s the new name for them) only if you are fine with these shortcomings. For a true ND effect, stick with regular ND filters.
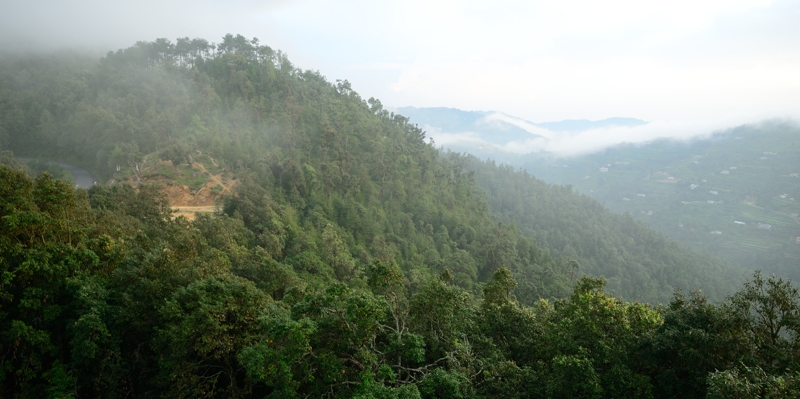
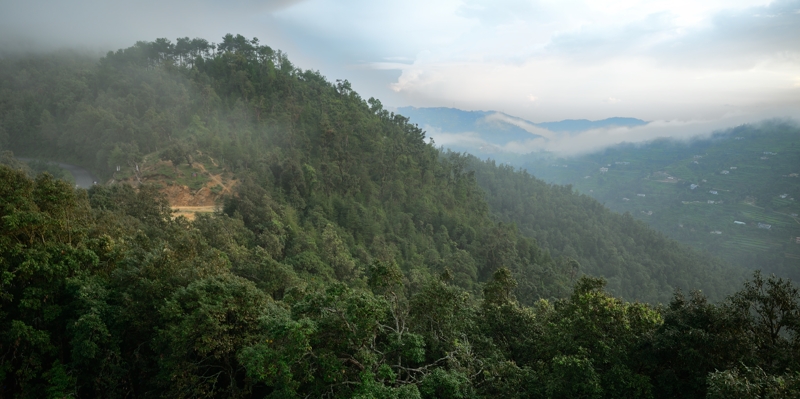
(Hills without any ND filter above. Notice the blown our sky and distant hills. The picture below is with a graduated ND filter which retains the cloud details in the sky. Read on for more)
Graduated ND filters
ND filters are also available in varying density from one end to the other. These are called Graduated ND filters. Graduated filters are colored filters that are dark on one end and usually transparent on the other. These come in a plethora of colors, starting from light tints of blues to deep dark shades or red. Some of these have fancy names too like – sunset filters, twilight, blue-sky filters. Graduated filters (or simply Grads) are a very creative set of filters. Graduated ND filters are one of these which as explained earlier do not impart any color of their own.
Graduated ND filters are very effective in darkening the clouds and sky. This adds drama to otherwise mundane images. Sometimes when reflections are to be shown, graduated ND filters can help darken the original subject bringing out the reflections.
These are available in both square forms and regular screw-on filters. For graduated filters, I recommend square forms since these can be shifted vertically to raise or lower the gradient. Screw on graduated ND filters have the gradient in the center which is not what is required in most landscapes.
Some tips while using graduated ND filters –
- Do not keep the graduated line straight in the frame.
- Use wide open apertures when possible. The graduation looks smooth. With small apertures, the graduation effect may look artificial.
- Keep away from ‘hard’ graduated filters. These have a sharp change from ND to clear area. Avoid these at all costs.
Further reading-
Polarizing Filters – This will help you understand how polarizers can also be used as ND filters sometimes.
Creating Motion Blurs – Some basics about long exposures.

What about ND400 filter? I did not see that in your list.
LikeLike
ND 400 filter provides a little less than 9 stops of reduction (8 and 2/3 stops). A lot of companies sell it as a 9 f-stop reduction filter but that is not true. If you think like me in terms of complete f-stops then a better option would be to buy a ND512 filter.
LikeLike