
The worst fate that a photography equipment can have is to remain packed and kept on a shelf in someone’s home. I have seen some of the best photography equipment available, not being used by their owners. It pains me to see all that beautiful equipment not being used. Recently I gathered the courage to ask a friend of mine about his beautiful digital Leica kept in a glass shelf. The answer I got- “It is too dirty outside in the city to risk carrying it around. I use the camera on family holidays when we go to some nice clean countryside. I however did not take it on my last holiday since that was in a beach resort with lots of sand and wind.” A few other photographers also have similar thoughts. For most people, their photography equipment is an expensive purchase and they do not want it to get dirty.
Lenses get spoiled when they are stored for long compared to when they are used. Same is true of camera electronics. I have seen fungus growth on new lenses that were stored for a few years unused, batteries getting spoiled due to deep discharge and even cameras malfunctioning. Moments that are once gone are gone forever. Cameras and lenses can be purchased again but those moments will not come back. Where’s the fun in storing the cameras and lenses?
I have compiled a list of steps that I take to keep my photography equipment clean. I hope this will take some fear out and help the readers of this page take their camera out more frequently.
Camera Body
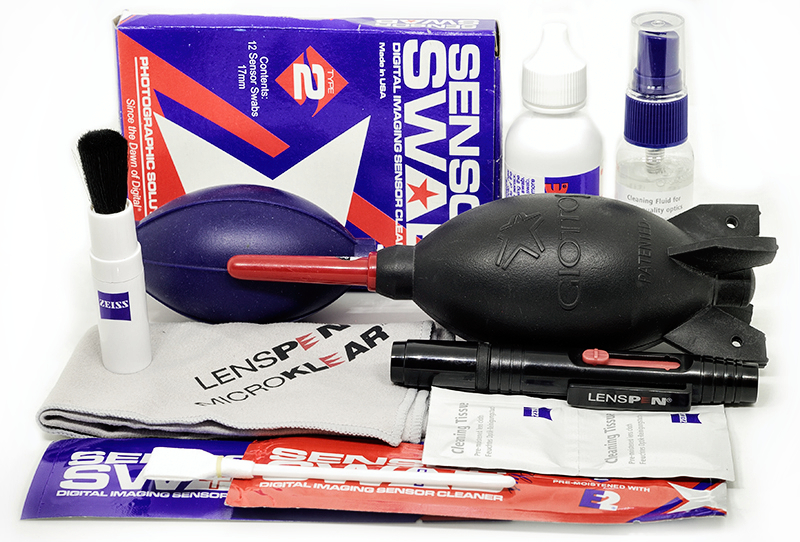
A soft bristle brush to clean the dust from the body. Lenspen has a good brush on one of its sides. Even thick makeup brushes work fine.
A blower bulb can be used to blow away any dust from hard to reach areas but the force can be so high that the dust can get blown into the camera body. I try to avoid it whenever I can. Blowing with mouth is again a no. The air from mouth is too moist and can sometimes contain particles of saliva.
In case of oil marks, cleaning with a micro-fiber cloth helps. The cloth however should not be rubbed too hard. I use a micro-fiber cloth for cleaning the viewfinder too.
Screen-protectors for the display screen is a prudent precaution. All my cameras have a screen guard on their display screen.
If you use primes like I do, there are chances that you might be changing the lenses quite frequently. Some basic precautions that help are- changing the lens in a non-windy clean area, keeping the camera off while changing the lens, reducing the changing time and reducing the changing frequency.
Camera Innards
Cleaning the innards of the camera is something that I do when I am in the sanctity of my home. First I use a good quality and not too old blower bulb. Old blower bulbs shed dry rubber dust. Do not use any blower which is very old and especially those that have been stored for too long in sun. The blower bulb also should not have a direct path for air-intake. There should be some kind of dust trap or filter to prevent dust being sucked into the bulb. I use blower bulb from Giottos. When using blower bulb, ensure that the tip is a tight fit in the bulb. You don’t want the tip flying off with a blow and hitting the inside of the camera, do you? (That’s a scary scenario to imagine!)
The good thing is that the dust on mirror and focusing screen does not affect the photos. It does have a tendency to move on to the sensor (or more accurately the protective clear piece protecting the sensor, which I’ll refer to as sensor as far as the cleaning is concerned). For cleaning the mirror and focusing screen , a couple of gentle puffs from blower bulb should do. Don’t use compressed air or high pressure air on the mirror. Don’t clean too often though. The dust may find its way into the penta-mirror or penta-prism assembly.
Focusing screen is held inside by a thin clip. You can unclip it using a dentist’s mirror and a forceps. Remember, focusing screen gets scratched easily and doing anything also puts your mirror to risk. I prefer to set a micro-fiber cloth in front of the mirror before working on focusing screen. Unclipping the focusing screen pops it out. Gently take it out without removing any ‘spacers’ or ‘shims’ if there are any. Clean it with distilled water a clean lint-free microfiber cloth. Don’t rub it! After drying slip it back and clip it gently. Even if the viewfinder is not completely clean, don’t bother. It’s not worth it going after the last visible piece of dust. Camera is meant to be used for photography and in the process it will get dirty!
Sensor Cleaning
Before going for sensor cleaning, I first check its condition. Easiest method is to set the aperture to its smallest setting, focus to infinity, aperture priority and then move the camera while photographing an evenly lit wall or paper sheet at close distance. The noise reduction in the camera should also be switched off. Check the resulting image at full resolution. and the dust particles should be visible. If they are large in number or appear in photos, it is time to clean the sensor. First step in cleaning the sensor is to use the blower bulb. Do not use canned air or any other methods to blow air. This can be attempted for a couple of times.
Next, check the sensor again using the method described above. If the dust is still there, it is time for moist cleaning. I use sensor swabs with fluid available from Photographic Solutions. (The photograph above shows the older version of sensor swabs and liquid. Photographic Solutions have come up with a new packing now.) Some precautions to keep in mind – charge the battery completely, do it in a clean and well-lit area, keep away from power switch while cleaning, move the swab only once in a single direction. If in doubt, take your camera to service center before attempting any of the above.
Lens
Cap the front and rear elements of the lens and then use the brush to clean the body. Slowly turn the focusing ring and open the zoom so as to extend the lens as much as possible and then clean the body again. Micro-fiber cloth can be used gently for cleaning the smooth parts of the lens body. If the lens is mounted, it can be cleaned while it is attached to the camera.
For the front of rear optic elements – use a blower bulb to blow off any dust. Next use a micro-fiber cloth to gently wipe of any stains or fingerprints. Zeiss makes some good wet tissues for cleaning optics but I find their paper too abrasive for my liking. The fluid however in them does help in removing stubborn stains. They can be used to moisten any such stain by dabbing on it and later cleaned off using microfiber cloth. My favorite micro-fiber cloth is marketed by Lenspen and comes in cream color (not the grey one shown in the picture above). Once the cloth is dirty, use it for any purpose other than cleaning optics. Do not wash it and reuse regardless of what the company says.
Do not open the lens. Some dust is common on the optical elements inside the lens. It does not affect the images so forget it.
Recent Addition – Cleaning Camera Accessories
Disclaimer: Whenever in doubt, take your camera or lens to the authorized service center. I prefer to clean everything at home but it can be risky and at times break your warranty. Do what you think is right. The above writing is just to give an insight into what I do.

Useful info. Thanks.
LikeLike